Swift - TableView
프로토콜은 채택하는 것이므로 상속과는 다르다.
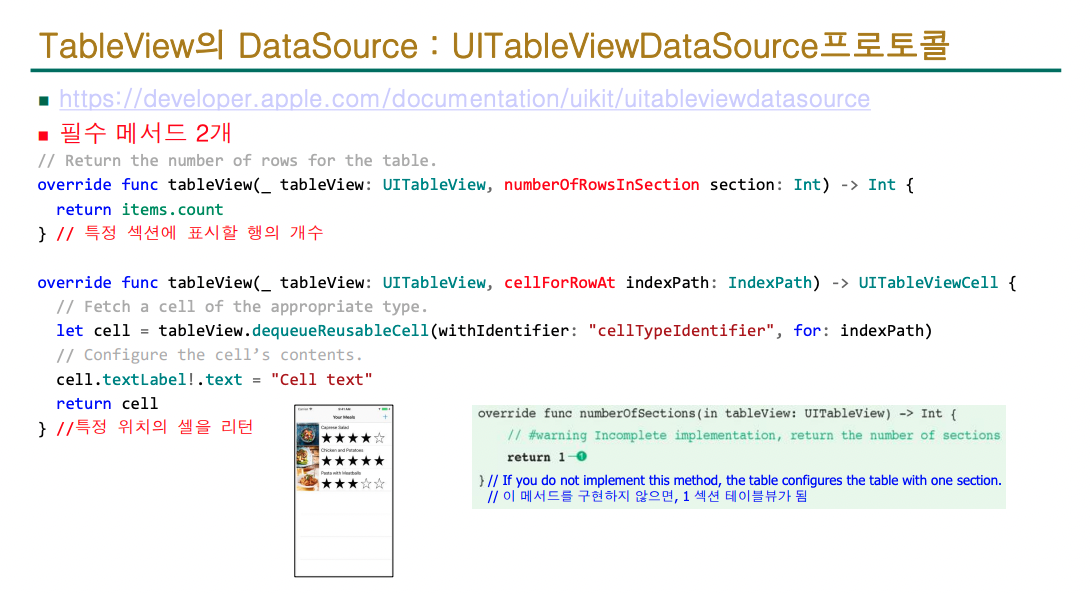
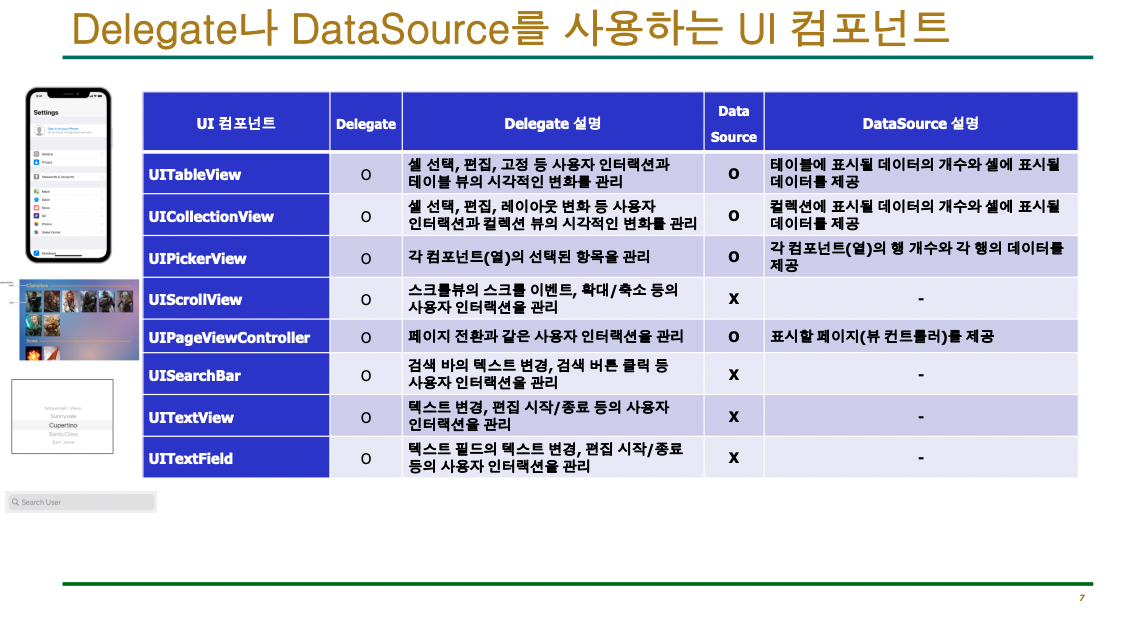
테이블뷰는 두 개의 프로토콜을 사용하는데, 데이터 소스에는 위아래로 두 개의 필수 메소드가 있고 Delegate는 필요하면 쓴다.
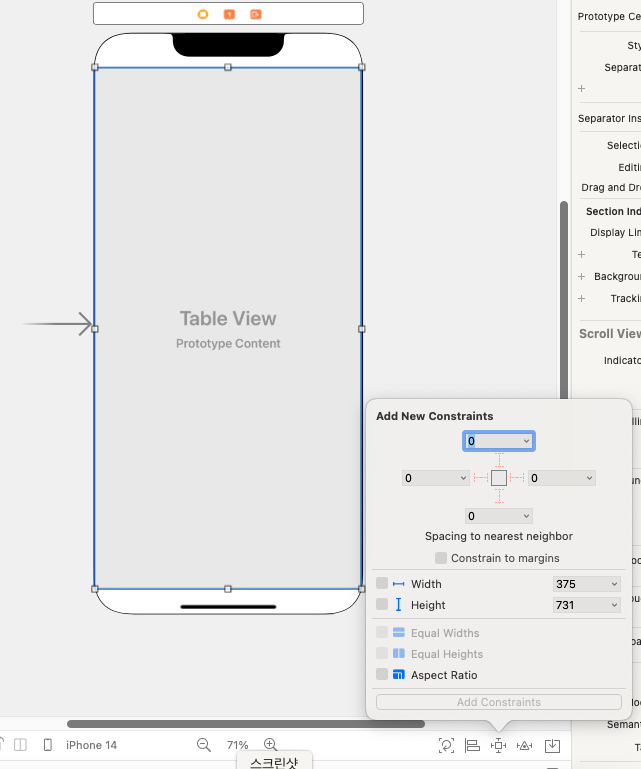
앱을 생성하고 라이브러리에서 Table View를 가져왔다. 처음에는 작은 사각형인데, 이를 깔끔하게 꽉 채우려면 오토레이아웃의 [핀 툴]을 이용하면 된다! 사방의 수치는 해당 방향에서 얼마나 떨어질 것인지를 설정하는 것이다. 그러므로 모두 0으로 한 후에 Constrain to margins 옵션을 해제해 주고 Add Constrains를 누르면 사진처럼 예쁘게 꽉 찬다.
- 위, 아래의 빈 공간이 있는 이유는 Safe Area 때문이다. 보통은 가리지 않고 사용한다.
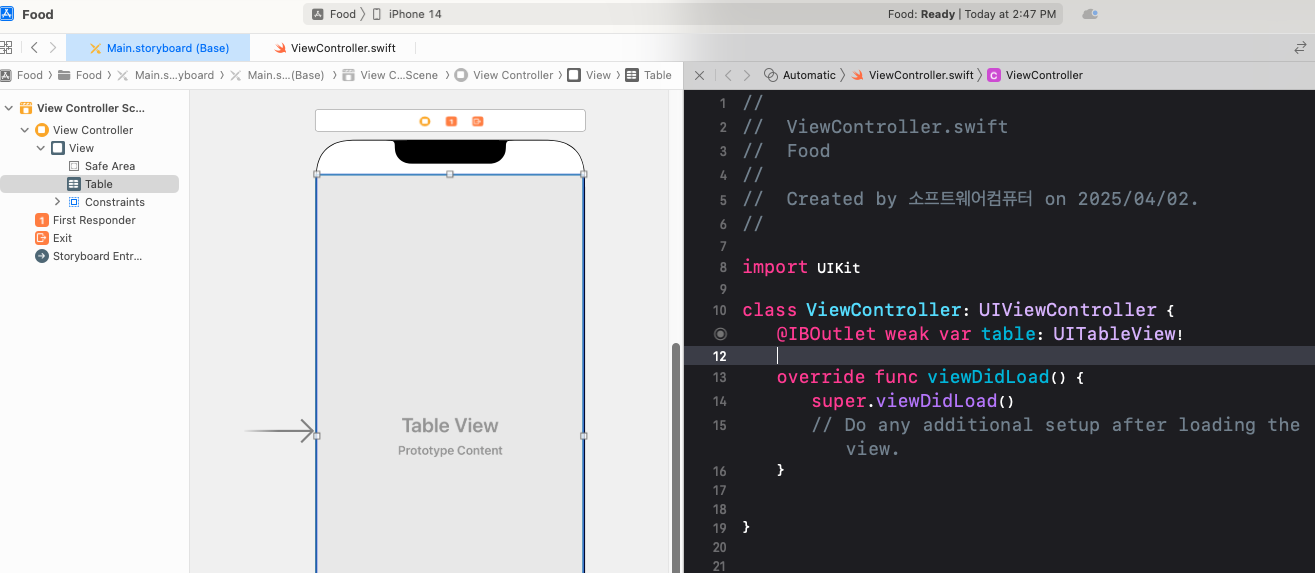
ViewController에 table이라는 이름의 Outlet을 추가했다. Document Outline에서 Table을 드래그, 오른쪽의 ViewController에 드랍하여 추가하면 된다.
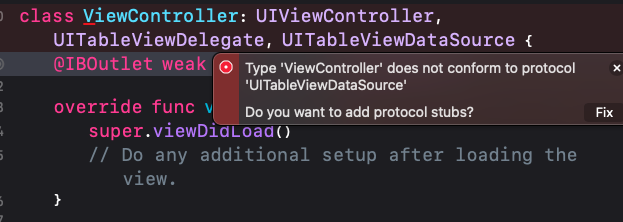
ViewController에 UITableViewDelegate와 UITableViewDataSource 프로토콜을 채택했다. 하지만 에러 메시지가 뜨는 모습이다.
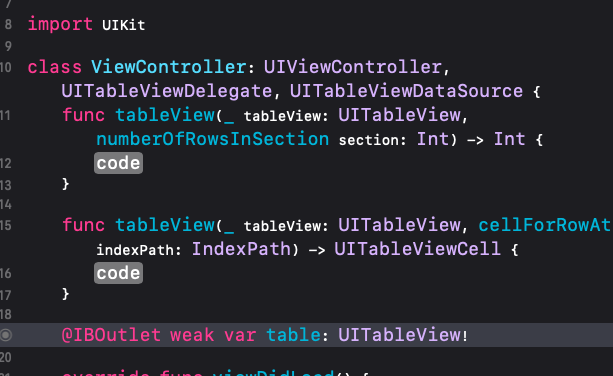
Fix를 누르면 아래 두 개의 메소드가 생성된다. 앞서 말했던 UITableViewDataSource의 필수 메소드 두 가지이다.
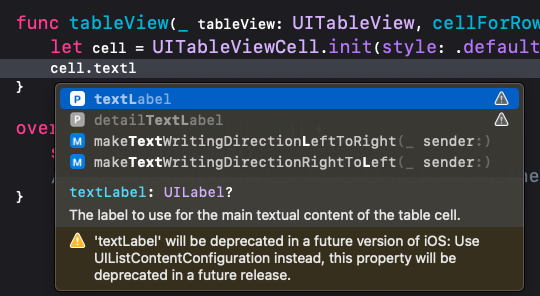
textLable을 사용하려고 하면 주의 표시가 뜨는데, 대충 다음 iOS 버전에서는 사용하지 않는다는 뜻이다. 대신 다른 걸 사용하라고 추천해 준다.
import UIKit

class ViewController: UIViewController, UITableViewDelegate, UITableViewDataSource {

    @IBOutlet weak var table: UITableView!

    func numberOfSections(in tableView: UITableView) -> Int {
        return 3
    }

    func tableView(_ tableView: UITableView, numberOfRowsInSection section: Int) -> Int {
        return 10
    }

    func tableView(_ tableView: UITableView, cellForRowAt indexPath: IndexPath) -> UITableViewCell {
        let cell = UITableViewCell.init(style: .default, reuseIdentifier: "myCell")
        cell.textLabel?.text = indexPath.description
        return cell
    }
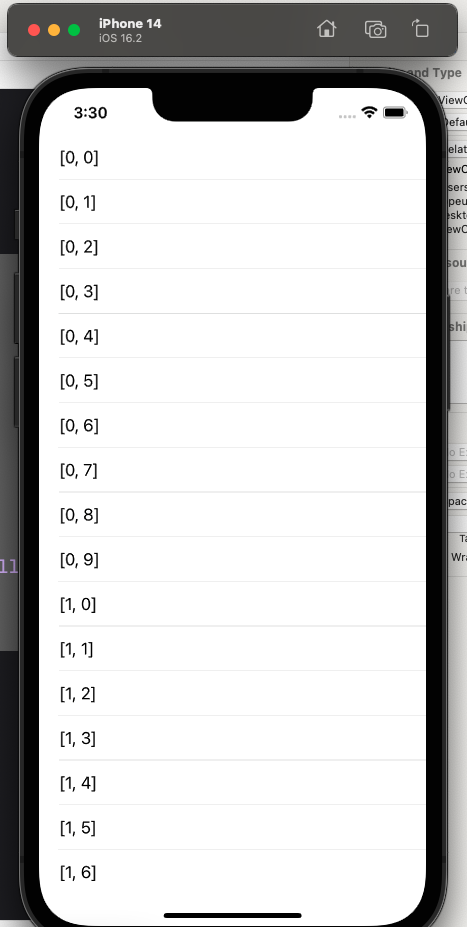
출력 결과
import UIKit

class ViewController: UIViewController, UITableViewDelegate, UITableViewDataSource {

    @IBOutlet weak var table: UITableView!

    func numberOfSections(in tableView: UITableView) -> Int {
        return 3
    }

    func tableView(_ tableView: UITableView, numberOfRowsInSection section: Int) -> Int {
        return 10
    }

    func tableView(_ tableView: UITableView, cellForRowAt indexPath: IndexPath) -> UITableViewCell {
        let cell = UITableViewCell.init(style: .default, reuseIdentifier: "myCell")
        cell.textLabel?.text = "\(indexPath.row)"
        return cell
    }

    override func viewDidLoad() {
        super.viewDidLoad()
        table.delegate = self
        table.dataSource = self
        // Do any additional setup after loading the view.
    }


}
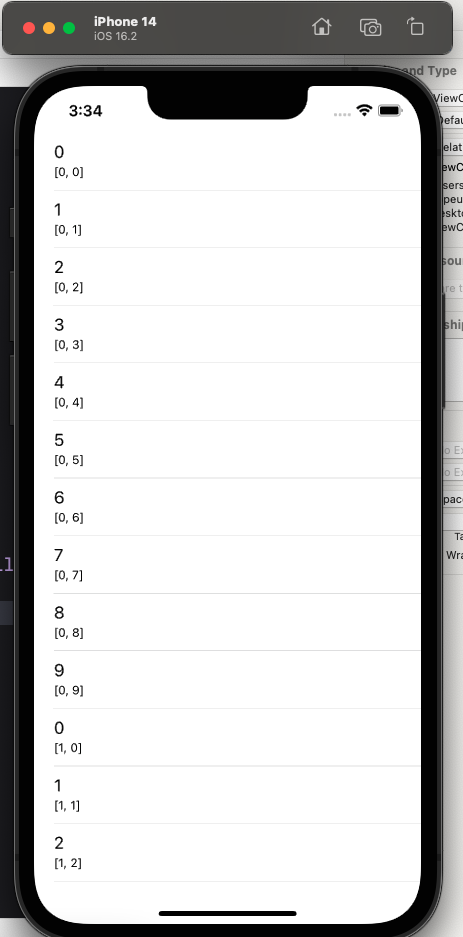
출력 결과

import UIKit

class ViewController: UIViewController, UITableViewDelegate, UITableViewDataSource {

    @IBOutlet weak var table: UITableView!

    func numberOfSections(in tableView: UITableView) -> Int {
        return 3
    }

    func tableView(_ tableView: UITableView, numberOfRowsInSection section: Int) -> Int {
        return 10
    }

    func tableView(_ tableView: UITableView, cellForRowAt indexPath: IndexPath) -> UITableViewCell {
        let cell = UITableViewCell.init(style: .subtitle, reuseIdentifier: "myCell")
        cell.textLabel?.text = "\(indexPath.row)"
        cell.detailTextLabel?.text = indexPath.description
        return cell
    }

    override func viewDidLoad() {
        super.viewDidLoad()
        table.delegate = self
        table.dataSource = self
        // Do any additional setup after loading the view.
    }


}
출력 결과
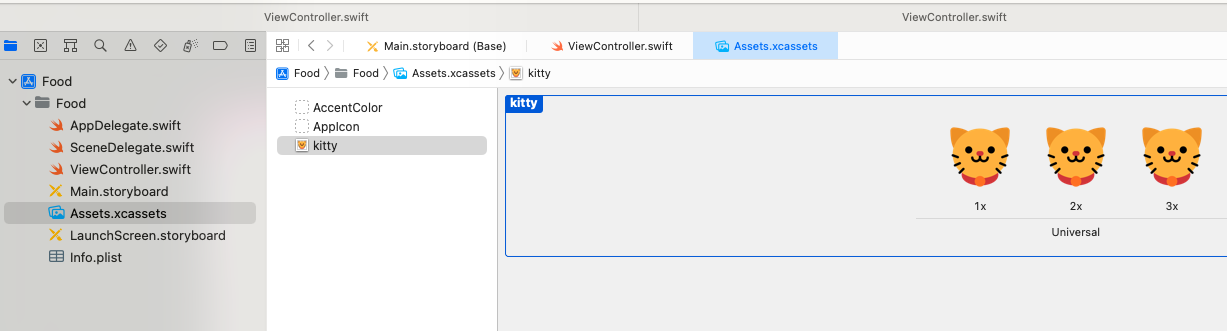
Assets에 맘에 드는 아이콘을 찾아 넣어 준다.
 func tableView(_ tableView: UITableView, cellForRowAt indexPath: IndexPath) -> UITableViewCell {
        let cell = UITableViewCell.init(style: .subtitle, reuseIdentifier: "myCell")
        cell.textLabel?.text = "\(indexPath.row)"
        cell.detailTextLabel?.text = indexPath.description
        cell.imageView?.image = UIImage(named: "kitty.png")
        return cell
    }
tableView를 이렇게 바꾸고, 실행시키면!
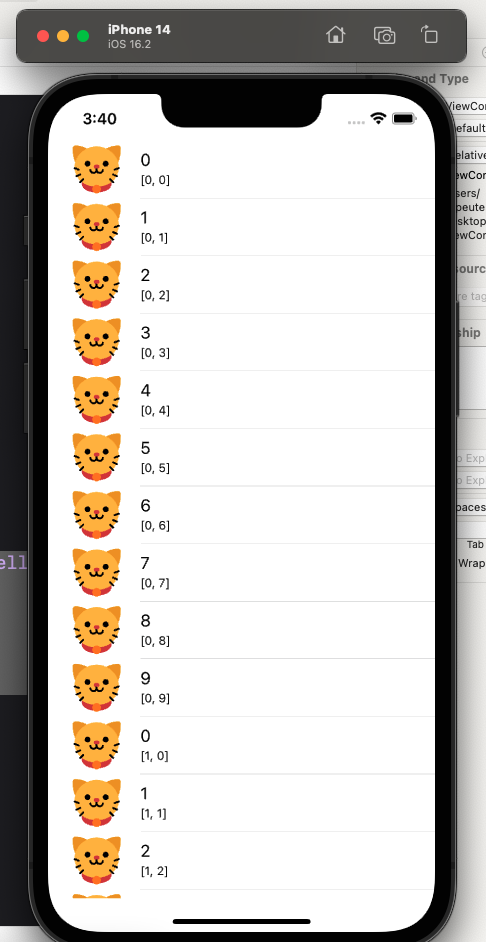
이렇게 귀여운 아이콘들이 잔뜩 나온다.
import UIKit
var image = ["1.png", "2.png", "3.png", "4.png", "5.png", "6.png", "7.png"]

class ViewController: UIViewController, UITableViewDelegate, UITableViewDataSource {

    @IBOutlet weak var table: UITableView!

    func numberOfSections(in tableView: UITableView) -> Int {
        return 6
    }

    func tableView(_ tableView: UITableView, numberOfRowsInSection section: Int) -> Int {
        return 7
    }

    func tableView(_ tableView: UITableView, cellForRowAt indexPath: IndexPath) -> UITableViewCell {
        let cell = UITableViewCell.init(style: .subtitle, reuseIdentifier: "myCell")
        cell.textLabel?.text = "\(indexPath.row)"
        cell.detailTextLabel?.text = indexPath.description
        cell.imageView?.image = UIImage(named: image[indexPath.row])
        return cell
    }

    override func viewDidLoad() {
        super.viewDidLoad()
        table.delegate = self
        table.dataSource = self
        // Do any additional setup after loading the view.
    }
}
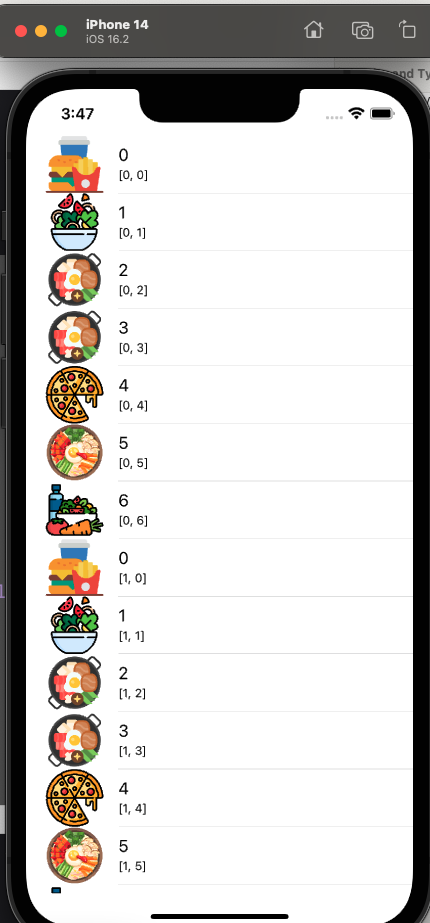
image 출력 부분을 바꾸어 사용해 보겠다. 다른 아이콘들도 더 가져와서 배열로 만들어 두었다.
import UIKit
var image = ["1.png", "2.png", "3.png", "4.png", "5.png", "6.png", "7.png"]
var foodName = ["한식","간식","학식","중식","일식","양식","샐러드"]

class ViewController: UIViewController, UITableViewDelegate, UITableViewDataSource {

    @IBOutlet weak var table: UITableView!

    func numberOfSections(in tableView: UITableView) -> Int {
        return 6
    }

    func tableView(_ tableView: UITableView, numberOfRowsInSection section: Int) -> Int {
        return 7
    }

    func tableView(_ tableView: UITableView, cellForRowAt indexPath: IndexPath) -> UITableViewCell {
        let cell = UITableViewCell.init(style: .subtitle, reuseIdentifier: "myCell")
        cell.textLabel?.text = foodName[indexPath.row]
        cell.detailTextLabel?.text = indexPath.description
        cell.imageView?.image = UIImage(named: image[indexPath.row])
        return cell
    }
foodName 배열을 추가해 주었다.
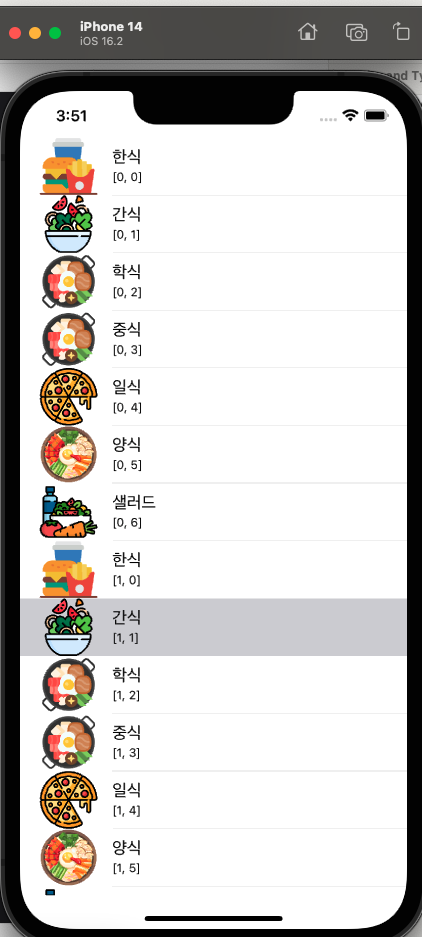
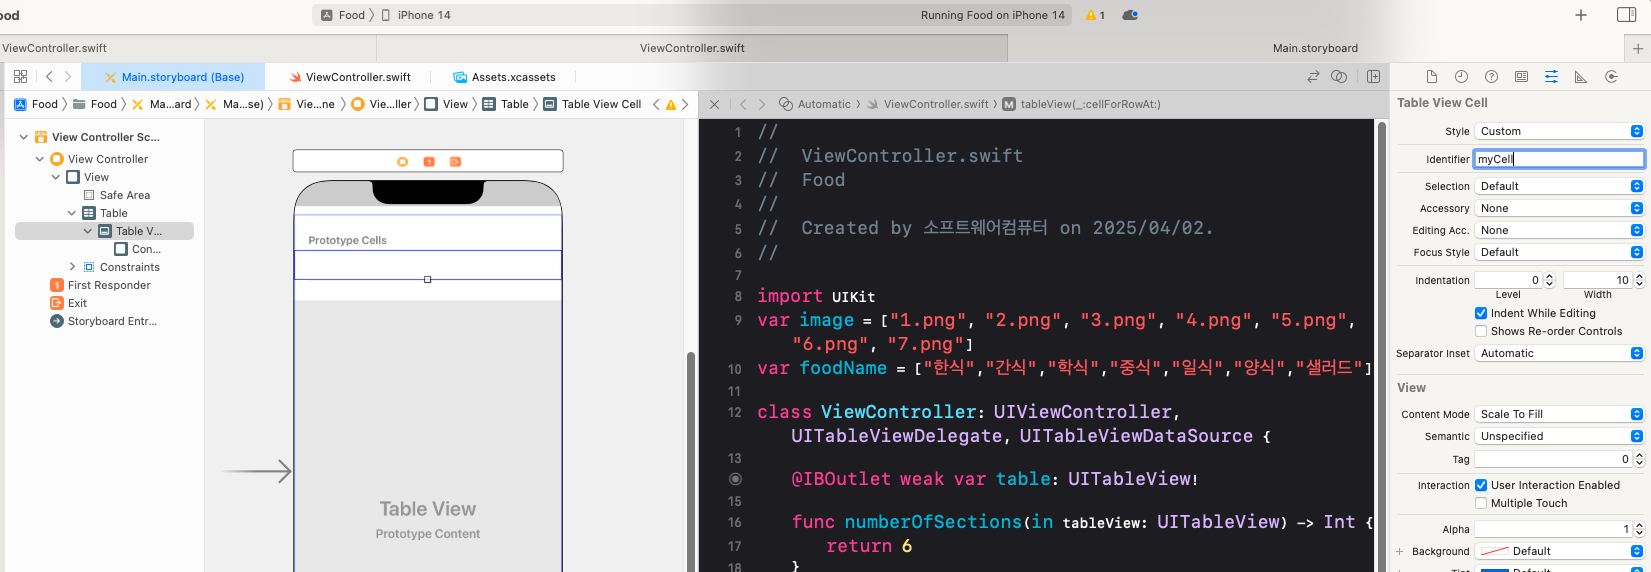
Table View Cell을 삽입한 후, identifier를 설정해 줘야 한다. 위 소스를 보면 reuseIdentifier을 "myCell"로 설정한 구문을 볼 수 있다. 여기서 사용되니 indentifier에 내가 설정한대로 입력해 주면 된다.
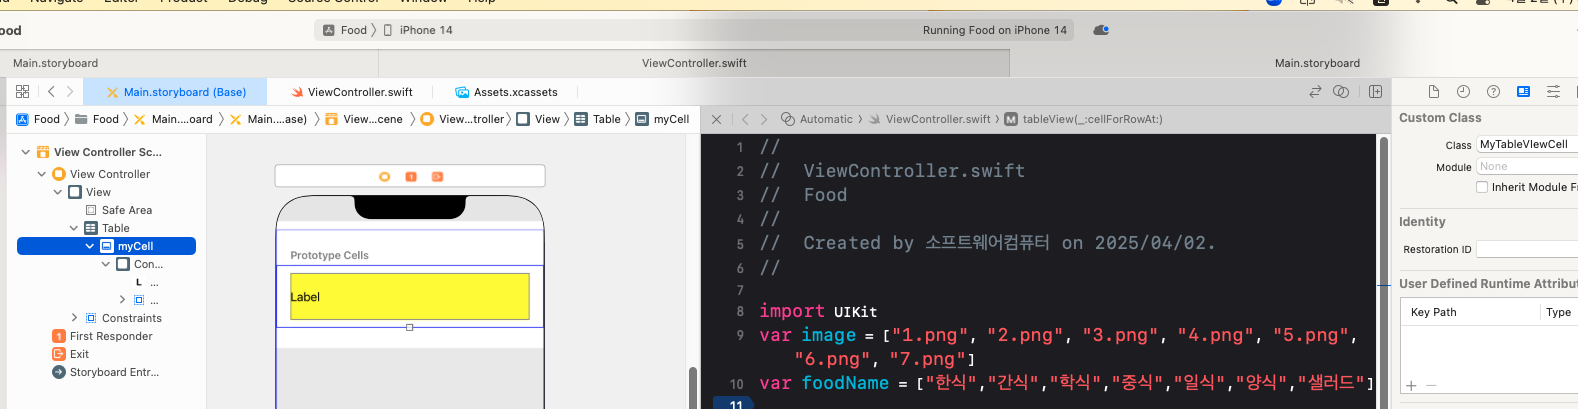
Cocoa Touch Class로 MyTableViewCell.swift 파일을 만들고, Table View Cell의 Class를 MyTableViewCell로 설정해 준다.
- Enter까지 꼭 쳐 줘야 적용된다!
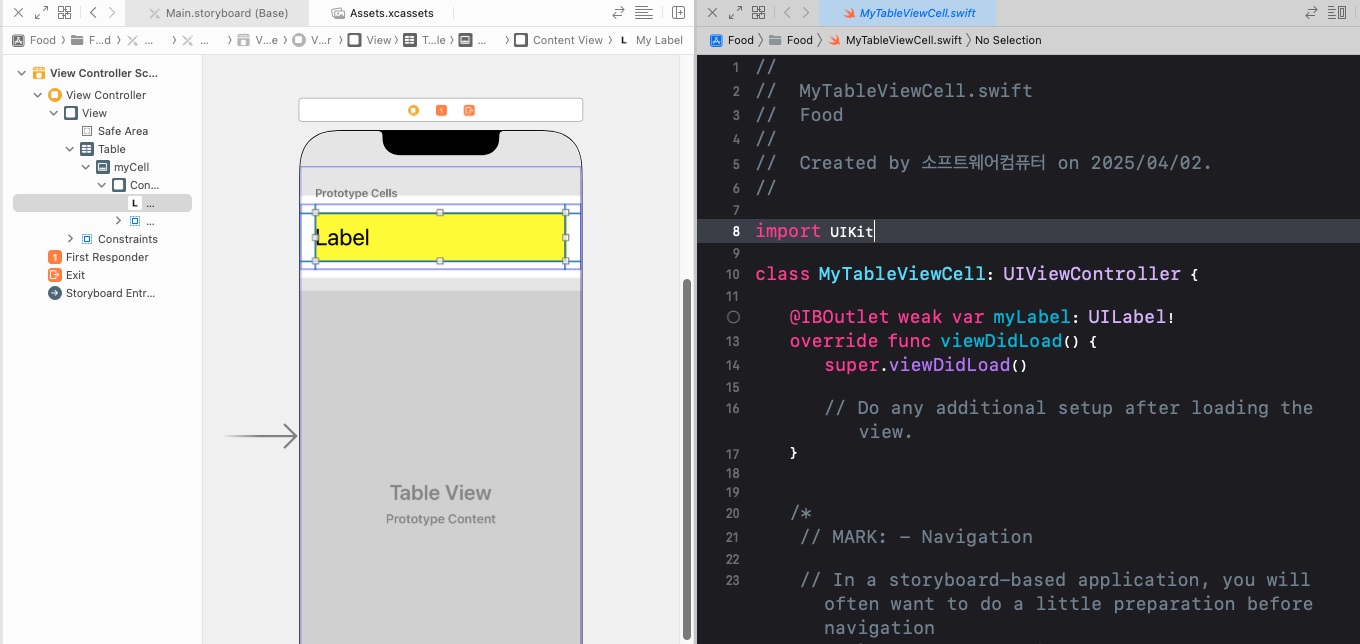
Lable을 Outlet으로 설정해 주기 위해 MyTableViewCell.swift 파일을 열었다. 오른쪽에 ViewController만 나온다면, 그냥 Alt른 누른 상태로 열고 싶은 파일을 클릭해 주자.
func tableView(_ tableView: UITableView, cellForRowAt indexPath: IndexPath) -> UITableViewCell {
//        let cell = UITableViewCell.init(style: .subtitle, reuseIdentifier: "myCell")
//        cell.textLabel?.text = foodName[indexPath.row]
//        cell.detailTextLabel?.text = indexPath.description
//        cell.imageView?.image = UIImage(named: image[indexPath.row])
        let cell = tableView.dequeueReusableCell(withIdentifier: "myCell", for: indexPath) //메모리 관리를 위함.
        cell.my //이렇게 쳐도 myLabel은 나오지 않는다. 부모에게 있기 떄문이다. 자식으로 다운캐스팅 해 줘야 한다.
        return cell
    }
 func tableView(_ tableView: UITableView, cellForRowAt indexPath: IndexPath) -> UITableViewCell {
        let cell = tableView.dequeueReusableCell(withIdentifier: "myCell", for: indexPath) as! MyTableViewCell //메모리 관리를 위함.
        cell.myLabel.text="aaaa"
        return cell
    }
ViewControllerd.swift 파일을 일부 수정했다. 이렇게 다운캐스팅 후에는 myLabel을 사용할 수 있다.
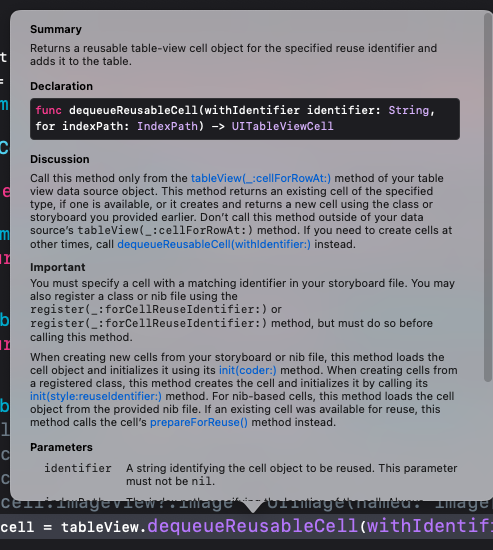
return형이 무엇인지 주목하자.
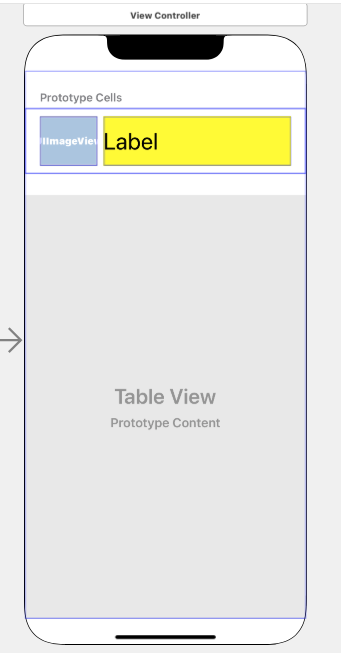
ImageView를 넣고, 똑같이 MyTableViewCell에 Outlet으로 설정해 주었다.
import UIKit
var image = ["1.png", "2.png", "3.png", "4.png", "5.png"]
var foodName = ["1한식","2간식","3학식","4중식","5일식","양식","샐러드"]

class ViewController: UIViewController, UITableViewDelegate, UITableViewDataSource {

    @IBOutlet weak var table: UITableView!


    func numberOfSections(in tableView: UITableView) -> Int {
        return 6
    }

    func tableView(_ tableView: UITableView, numberOfRowsInSection section: Int) -> Int {
        return 5
    }
    func tableView(_ tableView: UITableView, didSelectRowAt indexPath: IndexPath) {
        print(indexPath.description)
    }

    func tableView(_ tableView: UITableView, cellForRowAt indexPath: IndexPath) -> UITableViewCell {
        let cell = tableView.dequeueReusableCell(withIdentifier: "myCell", for: indexPath) as! MyTableViewCell //메모리 관리를 위함.
        cell.myLabel.text = foodName[indexPath.row]
        cell.myImage.image=UIImage(named: image[indexPath.row])
        return cell
    }

    override func viewDidLoad() {
        super.viewDidLoad()
        table.delegate = self
        table.dataSource = self
        // Do any additional setup after loading the view.
    }
}
이렇게 소스를 변경한 후, 실행하면 예쁜 앱이 나온다!
모든 출처: youtube - smile han